Use IBM® Cognos® Event Studio to
define business events or exceptional conditions in your data that
require attention. Create agents to monitor your data and notify decision-makers
in your organization of events as they happen, so that they can make
timely and effective decisions. You create agents to perform tasks
or deliver alerts when the data meets predefined thresholds.
This exercise shows how to
- Define business events
- Define agent tasks
- Review the status of events
You are a business analyst for the Sample Outdoors Company.
You want to ensure that your customers are satisfied with the products
and services that you provide. In particular, if products are returned,
you want to investigate why, and ensure that you offer a replacement
before your customers decide to shop elsewhere.
Event Studio
can notify you when a customer returns a product because it was defective,
unsatisfactory, incomplete, or because the wrong product was shipped
to them. You want to immediately send an email to your customer service
department with details about the order and the customer, so that
they can contact the customer.
You will create an agent that
looks like the Event Studio sample Returns Agent in the GO Sales (query) sample package.
To perform this exercise, you must have the appropriate licensing
and security permissions.
The tasks that you need to perform
to create an agent in Event Studio appear in the I want
to area. By default, when you open Event Studio, you start
with the first task, defining an event.
Procedure
- Open IBM Cognos Connection:
- Start your Web browser.
- In the address bar, type the URL supplied by your administrator,
and then press Enter. The URL looks something
like this: http://servername/cognos
- In the IBM Cognos Welcome page,
click Manage my events to open Event Studio.
- Click Samples, Models, GO Sales (query).
- Create the expression that defines the event:
- In the Insertable Objects pane,
expand Returned items (query) and Returned items.
- Under Returned items (query),
expand Return reason.
- Use both Return quantity and Reason description to create the following expression: [Return quantity]>0 AND [Reason description] IN ('Wrong
product shipped','Unsatisfactory product','Incomplete product','Defective
product') Tip: Insert items from the Insertable Objects pane. To select from a list of possible
values for the return reason, click the select values button. Move
the values you want from the Select Value box
to the Selected Items box and click OK.
- Click the validate button to validate your expression. Tip: You can also click Preview from the Actions menu to see the data retrieved
from the data source.
You defined the expression that will notify you whenever
a customer returns a product because it was defective, unsatisfactory,
incomplete, or because the wrong product was shipped to them.
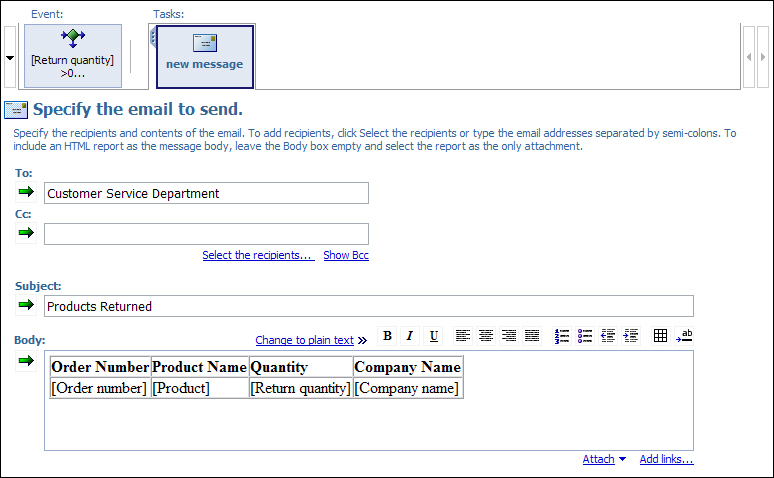
- Create an email task to immediately send an email to your
customer service department with details about the returned order
and the customer so that they can contact the customer:
- In the I want to list, click Add a task and click Send an email.
- In the To box, type the email
address for the customer service department. Tip: Since this example is for learning purposes, the agent will not
actually run. Therefore, you can type any email address.
- In the Subject, type Products Returned.
- Above the Body box, click the
insert table button, specify four columns and two rows, and click OK.
- Add information about returned products to the table
as follows:
Manually type the text for the
heading row of the table. Overwrite the insert text... text in each cell.
Drag objects from the Insertable
Objects pane to the last row of the table.
Tip: In the Insertable Objects pane,
expand Returned items (query). Expand Order to find Order number; Products to find Product; Returned items to find Return quantity, and Retailers to find Company
name.
| Order Number |
Product Name |
Quantity |
Company Name |
|---|
| [Order number] |
[Product] |
[Return quantity] |
[Company name] |
When the agent runs, the data item for each event is replaced
by the current value in the package.
- Select the heading row and then click bold to make the
column headings more prominent.
- Set the execution rules so that a notification is sent
for new events only:
- In the I want to list, click Manage the task execution rules.
- Click the Event Key tab.
- In the Insertable Objects pane,
click the Source tab.
- Expand Sales (query), Order, and drag Order number to
the Event key box.
- Click the Event Selection tab.
- Under Select when to perform this task, ensure that only the New events check box
is selected.
- Click OK.
- Set the schedule for when you want to the event to run:
- In the I want to list, click Schedule the agent.
- In the Set the schedule pane,
under Frequency, click the By Day tab, and select Every 1 hour(s).
- Click OK.
- Save the agent as Returns Agent. Each hour, the agent runs and the next time a customer
returns a product, an email is sent to the customer service department
with information about the order.
Example
Attach the event list to the email. An event list shows
the events that the agent processed. In this example, the event that
we defined is when a customer returns a product.
Tip: In the summary area, click the Products Returned email task. Below the Body box, click Attach, and then click Attach the event list.
What to do next
For information about creating agents, see the Cognos
Event Studio online help.
